that I will post soon. My husband's family has been here this whole week and it's been so much fun spending all this time with them--I've barely had the time to miss my sewing machine! And this'll probably be the last time we're all together for a few years, so we've really taken advantage of it. I'm sad to see them go so soon :(
But coming up, I've got a couple projects waiting, including some top-sewing, alterations on my temple dress (that can apply to a lot of things; I've figured out how to lengthen my sleeves that I accidentally made a little too short.. that was really not smart) and another bathroom organization project! Oh, and an eyelet shirt--I've had my eye on some fabric (hehe... eyeing eyelet fabric...) for a while but wasn't sure what to do with it... a quick visit to Anthropologie today gave me an idea though, so we'll see how it comes through!
Lulu can't wait to get back to work :)
Saturday, July 31, 2010
Sunday, July 25, 2010
Dance skirt
So... a while ago I lost my practice shoes and one of my dance skirts somewhere on campus. It made me terribly sad, but at least I had an extra dance skirt. However, this dance skirt has always felt too small, and I'm already a short-ish standard dancer, so I don't need a skirt that makes me look stubby...

ick.
I've been wanting to just make a new one (because those skirts are EXPENSIVE!) by simply copying the pattern of my skirt and making it longer, but the fabric too is expensive! And I couldn't find some thick enough. So I thinks to myself: how about adding fabric to the bottom?

(hehe do you like the purple toenails? :) I was worried it would look too tacky/cheap fix-ish, but since the new fabric is a bit shinier it actually just looks like a wide ribbon-type band around the bottom. I'm quite happy with how it turned out, and the best part is I am no longer a stubby dancer!

Ok, who am I kidding, I'm still short, but the extra inches will do wonders for my dance lines hopefully!
Wednesday, July 21, 2010
Really really cool...
This person makes teensy weensy little things in doll-house size... check it out it's unbelievable!
http://www.flickr.com/photos/shay-aaron/4539161660/in/photostream/
http://www.flickr.com/photos/shay-aaron/4539161660/in/photostream/
Tuesday, July 20, 2010
Family mat
This is entirely not my idea, but it's all I've been doing lately. You've probably seen those mats around copies of The Family: a Proclamation to the World with pictures and all-- well I though they were pretty cool but the cost of printing tons of quadruple copies of passport-size photos wasn't appealing.
I found a perfect-size mat at a yard sale and then thought: how about doing it on the computer and color-printing an already set up mat? So I got to work and it's still in progress. I just measured the mat and drew a frame the same dimensions in Word and.. this is what it looks like so far.


Fun stuff! I'll post pictures once it's a little more complete.
Sunday, July 11, 2010
This is how excited I am

About my new project.
I've had my eye on those fancy new jeans--the ones with thick white stitching.

I hate the bling some of them have on them but I finally found a pair I loved... the only hiccup was they're worth 300$... not really worth it. Especially since I've never really been a jeans person. I found a similar pair for 100$ but still.. Not worth it. So...
I decided I'd just do it myself!
I have a pair of jeans I sometimes wear (only cost 15$ too) but I'm not necessarily that attached to them, so why not try this out on them.
All it takes is some good white yarn...

a FAT needle

and a LOT of patience (and tough fingertips. This is when I wish I had one of those rubber thimbles... I can't even remember how many times I poked myself. No blood though!)
But it definitely paid off. I just followed the original stitching, going four stitches long and skipping one. After several grueling hours...
Voilà!


Putting True Religion out of business one stitch at a time... :) It's a stupid name for a brand anyway--what, we're supposed to worship their pants?!
Saturday, July 10, 2010
It may be possible that I have too much time on my hands...
But here's how to turn a very boring white collared shirt...

Into something from out of Africa :)
Just un-stitch the collar...


Close it up without the collar...

Use a piece of the collar to make two strips, making buttonholes at one end of each of them:

Attach to the inside of your rolled-up sleeves...

Buttons...

And tadaam!

(This is the "I've been sewing for too long just now" look)
Not terribly exciting, but more casual and therefore I'll probably wear it more now. The fit was fine, it was just such a boring shirt, and with my news director pounding the no white & no black on set rule... I had no use for a white collared shirt whatsoever! Hmm, I think this'll go quite well with that seersucker skirt...
Oh, and incidentally... my sewing supplies are going German on me!

Friday, July 9, 2010
Summer = seersucker
Here's a really fun project, that surprisingly was a real pain when I got to the "belt" portion. It worked out all right though-- all it took was a yard of fabric!
And this is some fun fabric :)

hmm... I'm taking blurry pictures lately; I'll have to fix that.
I just cut the yard into two 1/2 yard wide strips and sewed them together, then gathered the top (Only attach them together at one end, leave the skirt open until after attaching the belt portion)
Once that was done I sewed the backside of a strip of matching yellow fabric (what's that, about 6/7 inches wide?) to the top of the gathered part.

Then fold it over the other side, pinning all over the place to make sure it lies flat... I used a zigzag stitch to flatten a little better, and then made one side extend past the skirt fabric to add a buttonhole to close the skirt.


Once the top belt part is done, now go ahead and sew the skirt closed (leaving a little space at the top to open it) and there you go!

Oops! forgot the hem! But you knew that right? ;)
 |
Thursday, July 8, 2010
Pants.
I have loved these pants a little too much...

(And I realize the colors are weird. It's what happens when you let your colorblind husband take the picture :)
And perhaps washing them in the machine wasn't a good idea. Either way, they were so completely beat that even with patches people kept telling me I had a hole in my pants... I got the hint. So I made them again! Thanks to a 40% off coupon I got the fabric for the grand total of $9. Not too shabby for a pair of pants! I got a linen blend too so they'd be a little sturdier (and it was cheaper than full linen).
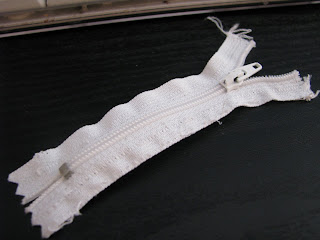
It was a little tricky once I got to the zipper,

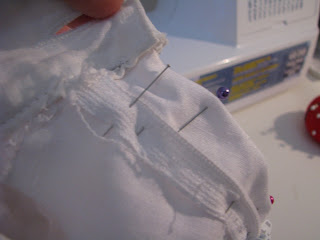
but apart from that the rest was pretty straightforward. I simply unpicked the main seams and cut my new fabric off of the pieces, just like you would use a pattern. I even kept the zipper (although if you ever do that, it's a really bad idea to pull the zipper too high... I accidentally pulled it all the way off and had to fight with it to get it back on. I won though :)
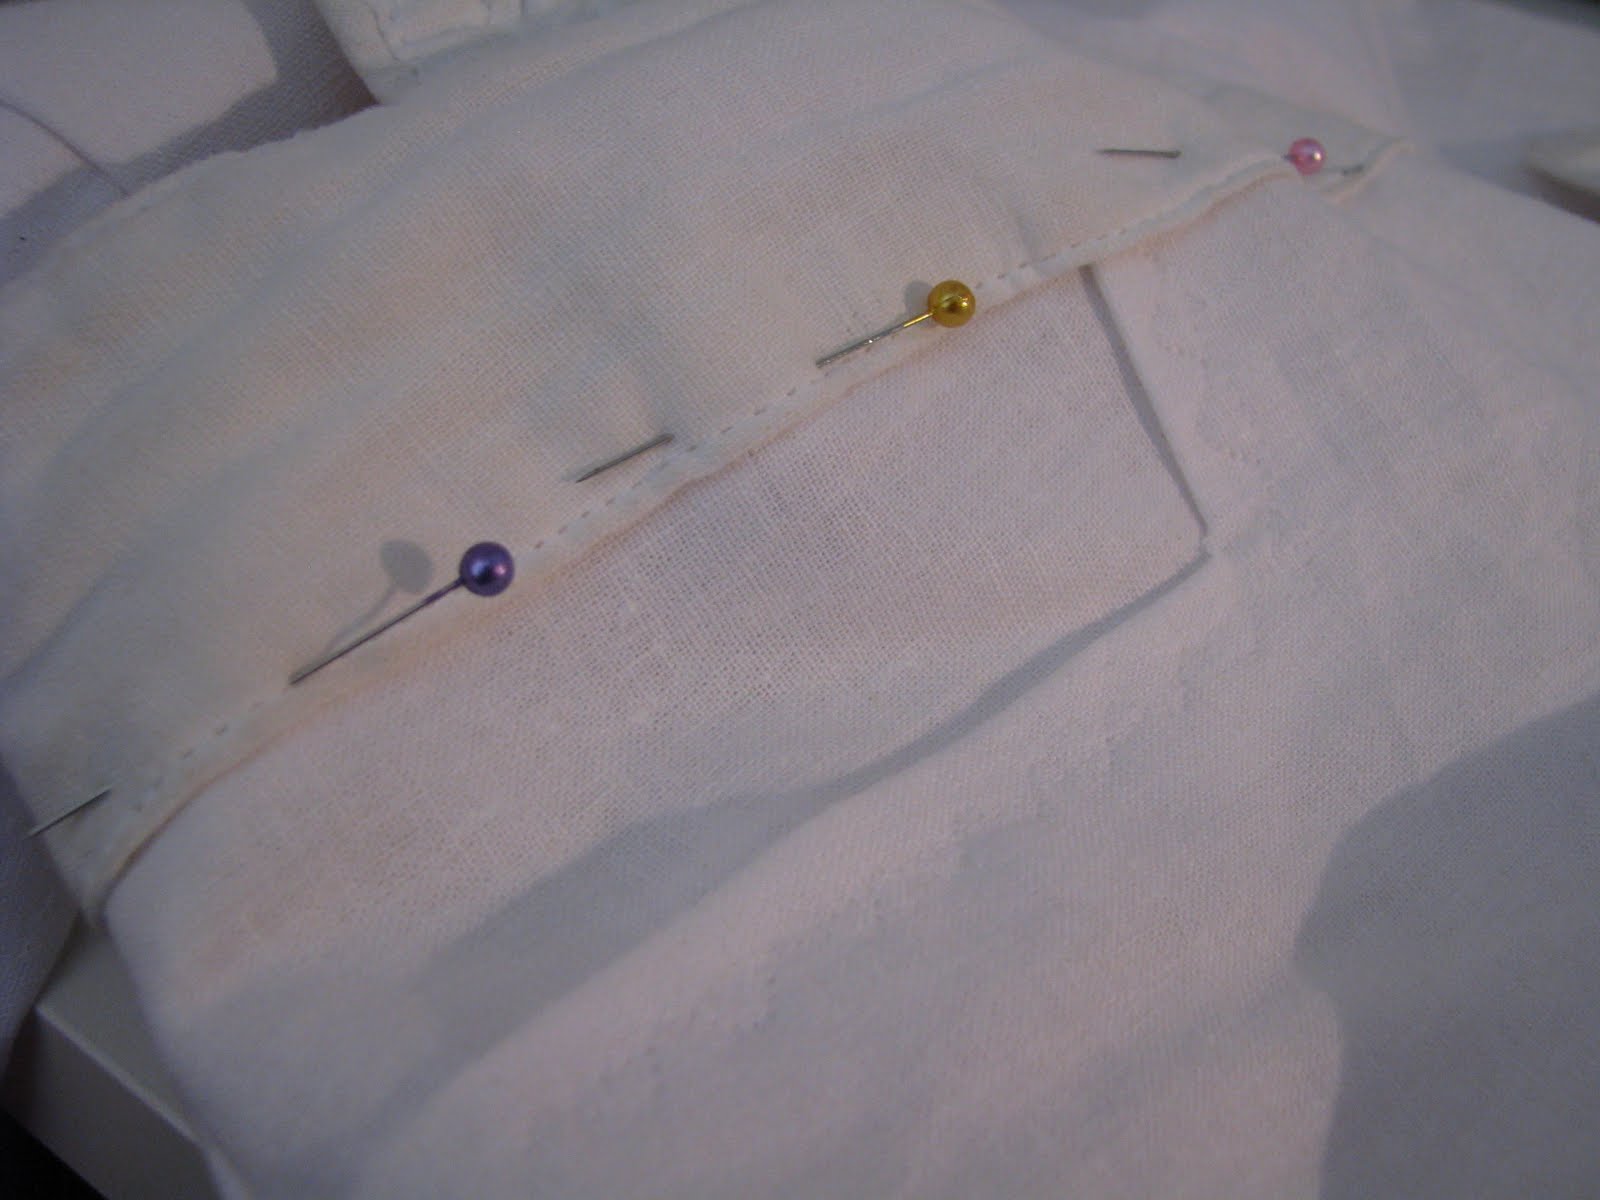
I also kept the top "belt" part since it was still in great condition and I didn't want to make things more complicated than necessary--it gives the pants a good finished look.

As you can see from the picture... those pants were a size 9... I'm not quite sure what goes through my head sometimes but I have serious depth/size perception issues. So I made the pants a tad bit smaller too...
Once I had put the legs together and added the zipper I pinned the top belt part to it and... voilà! Oh, and some back pockets too!

The front had some funny fake pockets so I just recreated those as well before sewing the pant legs together, and did a decorative stitch to set them apart.

That's about it I think... After I was sure they fit right I went back and zigzag stitched all the major seams and flattened the outside seams to make sure they'll stay.
I am quite happy with the result!

They could probably use a bon coup de fer (iron) though...
Oh, and I have something else to show you tomorrow! It involves seersucker... :)

(And I realize the colors are weird. It's what happens when you let your colorblind husband take the picture :)
And perhaps washing them in the machine wasn't a good idea. Either way, they were so completely beat that even with patches people kept telling me I had a hole in my pants... I got the hint. So I made them again! Thanks to a 40% off coupon I got the fabric for the grand total of $9. Not too shabby for a pair of pants! I got a linen blend too so they'd be a little sturdier (and it was cheaper than full linen).
It was a little tricky once I got to the zipper,


but apart from that the rest was pretty straightforward. I simply unpicked the main seams and cut my new fabric off of the pieces, just like you would use a pattern. I even kept the zipper (although if you ever do that, it's a really bad idea to pull the zipper too high... I accidentally pulled it all the way off and had to fight with it to get it back on. I won though :)

I also kept the top "belt" part since it was still in great condition and I didn't want to make things more complicated than necessary--it gives the pants a good finished look.

As you can see from the picture... those pants were a size 9... I'm not quite sure what goes through my head sometimes but I have serious depth/size perception issues. So I made the pants a tad bit smaller too...
Once I had put the legs together and added the zipper I pinned the top belt part to it and... voilà! Oh, and some back pockets too!

The front had some funny fake pockets so I just recreated those as well before sewing the pant legs together, and did a decorative stitch to set them apart.
That's about it I think... After I was sure they fit right I went back and zigzag stitched all the major seams and flattened the outside seams to make sure they'll stay.
I am quite happy with the result!

They could probably use a bon coup de fer (iron) though...
Oh, and I have something else to show you tomorrow! It involves seersucker... :)
Wednesday, July 7, 2010
A project that doesn't cost anything AND makes the kitchen look neater??
Yep. All you need is a kitchen dishrag. (I think I may be starting to sound like a telemarketer. I will try to resolve that). Follow the instructions here.

I changed it slightly-- I used an old worn-out hair-tie for the elastic and cut it a little shorter to use some of the fabric for the strap since I didn't have any fancy twill tape on hand. Oh, and I used a button in my case because I wanted to loop it over the side bar of our table.

It looks a little lumpy because we don't actually have that many plastic bags right now... But that's a good thing right? We typically use reusable bags we brought back from France when we remember to take them with us. My family even sent us some with pictures of my hometown on them... talk about grocery shopping in style! :)

How to save on fabrics...
- Sign up for Jo-Ann's newsletter/coupons email list and keep the coupons you may want
- Scrap piles-- typically they're under a yard, but that can be enough for a shirt or skirt! Or a table-runner :)
- Did you know if you show your student ID at Jo-Ann's you get 10% off your purchase? Wish I'd known that before checking out.
- Walmart can have some good stuff for cheaper
Got any other ideas?
And coming soon: my favorite (beat-up) pants revisited and a summer seersucker skirt...
Monday, July 5, 2010
I may have gone a little overboard with the whole red white and blue...
But that's what summer is all about right? Having too much time on your hands. And it's fun.
So just a few ruffles on an old dish rag...

And a few buttons for some patriotic flair!


I learned how to make these on another blog, but I can't remember where. This is a good tutorial though.
So just a few ruffles on an old dish rag...

And a few buttons for some patriotic flair!


I learned how to make these on another blog, but I can't remember where. This is a good tutorial though.
Saturday, July 3, 2010
Independence day project--or where I learned to have my machine make ruffles for me!
When you live in an apartment, there's not that much you can do as far as exterior decorating without impeding traffic that passes your door. Which is one reason I enjoy table-runners--it's a great way to give some oomph to your living quarters. So as I listen to "Spirit of America" by the MoTab, here goes.
This is essentially a variation on the Easter table-runner I made a while ago, but cooler for reasons that are hopefully apparent :)

Forage through the fabric pile (Incidentally, a great way to have random fabrics in your fabric pile is the scraps bin at places like jo-anns or even walmart. Cheap half yards of random fabrics are the best way to stock up on material for projects like this. I haven't actually bought ANY new fabric for this project--I had just picked it up when I saw some potentially useful scraps. Oh, and they typically cost under a dollar--not too shabby!)
1) Start by cutting out strips the about a foot long and varying widths (between about 2 inches and 5/6 inches.) in red white and blue patchwork-type fabric. Don't make any wide white ones, just do those in red and blue. Make more thin strips than wide ones. Then cut as many 1 1/2 inch white strips as you did 5/6 inch red and blue ones. These white strips will be the ruffles, so make them about 1 1/2 times longer than the other strips (so about 1'6'' give or take).

Mine is the size of a long place mat, since I have a mini kitchen table, but you can make it as long as your heart desires-- just keep adding strips.
Also cut one big piece of fabric about one foot 4 inches wide, and about 4 inches longer than you want the runner to be (this will be your base). Blue is probably the best color to use, since it won't show dirt/dust as badly as white or red. Set this aside since you'll add it last.
2) Sew your strips together (lengthwise) interchanging widths. You'll use less white strips since there are the white ruffles to add later. I'm lazy, but you really should iron the seams out before adding the ruffles (next step)

3) Now for them ruffles. This is the coolest part, because you essentially don't have to do anything except adjust your machine. If you want the machine to gather the fabric, simply set it to a longer stitch and maximum tension (tension is the little wheel at the top)-- it does all the gathering for you!

Don't cut the thread too short-- leave a nice long tail so you can adjust the ruffles if they're too close or not close enough together. To tighten the ruffles, pull on one of the threads (not both!) and adjust. For this project, tighten the tension to the maximum and make the stitches longer but not the longest setting--they'll be way too tight. (The top number is the thread length on my machine-- it's probably indicated by something like this design - -- --- ---- ----)

You might want to play around with scraps before doing the real thing so you can get a hang of it.
Sew down the middle of your white thin strips to make the ruffles. They should end up the same length as the other strips, so pull on the string/loosen to get the desired length.

4) Now you're going to sew these ruffles onto the middle of your wider sections. Just sew straight down the middle again. It's ok if it flattens down a little--that's the point.

5) We're getting there! Now let's add on the back. Sew it onto one length of your strip concoction.

Now for the other side, but instead of making the two pieces of fabric flat against each other, make the solid side longer by about 3 inches. Only sew the long sides at this point.

6) Turn it right side out. Because the Blue side is wider you have a blue edging now-- pin it flat.

7) Now for the ends (short sides). Fold over the ends twice to get a blue edge that is the same width as the long sides. Pin it flat too.


8) Now for the fun part: You can either sew this edging down with thread the same color as your base (blue here--boring) OR you can do an embroidery stitch in one of the other colors-- I chose white since the ruffles are white--keeps the accents consistent. And I chose hearts because "I heart America"
(ok that was cheesy but come on... it works :)
Incidentally, if you happen to also have French heritage, this works for Bastille day (July 14th) too since the french flag is... blue white and red-- how perfect!
The best thing about the embroidery stitch is that it does the same thing on the other side too:

One note for going around the edges: instead of picking up and doing the next side when you get to a corner, lift the foot but leave the needle down into the fabric and turn your fabric so you can keep going down the next length from where you were.

It doesn't look perfect, but it does make it more continuous and you have less loose ends.
And voilà: you have your finished table-runner!

NOTE: this would make a really fun throw pillow too: just do steps 1-4 and then sew the back to front flat, without making the blue side wider, and then close it after stuffing. I'd make one myself but I'm afraid I'm out of fabric!
Subscribe to:
Posts (Atom)